The ski poles scratch built to look like old bamboo sticks, to go nicely with the vintage skis.
VW Kafer Skis, and ski rack
I'm starting to work on the extras now. This is the most enjoyable part of the build.
Im building the car as the vehicle loaded with holiday gear- skis, and sleighs.
Bindings soldered from scratch.
I used various brass tubes, wires, and sheets to solder the bindings.
Anti skid plate made from sand paper.
Straps are weathered Tamiya tape.
For scale comparison i placed the skis against the box of matches.
Ski rack soldered, and fixed, along with the bumper bracket.
Skis dry fitted. No straps as yet. I will not fix the skis permanently in place until the end of the build.
VW Kafer WIP
Adding the final touches to the car.
Running boards, side trim, bonnet trim, bonnet crest, and registration added.
I also done the fender piping. Used the black fishing line (Schimano Technium 20 lb BS).
Rear of the vehicle upgraded. Added the registration plate, mud flaps, country plate, and custom safety stop light.
VW Kafer 1950- headlights, and horn grilles.
Done the headlights today. Added extra detail like the reflector, which was missing, reflector retaining brackets, bezel screws, bezel fixing brackets.
Added the yellow lightbulbs.
I also weathered the inside of the light as to look rusty a little.
Then i fixed new horn grilles. 1950 split beetle had round grilles instead of oval ones offered by Revell.
VW Kafer rear lights.
Rear lights had to be built from scratch, as the lights supplied in the kit are from later model- oval beetle.
I painted the repair patches on the side panels just behind the doors.
Drivers side is painted as completed repair finished with darker shade of blue, and passengers side is repair under way, with some filler showing, and little primer hastily applied.
I glued all the glass, and doors in.
Sunroof tarp is also painted, and weathered.
Wheels are painted two tone blue- body colour for the outside of the rim, and lighter blue for inner.
Hubcaps were washed from factory chrome, and painted Alclad Chrome again, and weathered to look rusty.
Bumpers converted to post 52 beetle, as the replaced units, without overriders.
Popes nose registration light built from scratch.
Added the rubber seals under the light units.
VW Kafer- painting
Before i started painting the body of the car i added the body damage here, and there.
Few dents, and scratches, also the deep rust in most common places.
Then the painting began.
After salt was applied i sprayed the body with layer of hairspray.
Another layer of hairspray was laid.
Stiff brush, and some water made the paint removal so easy.
VW Kafer- dashboard
The dashboard straight from the box is one piece.
...so i dismantled it:
...and built all the parts from scratch:
VW Kafer body prep
Due to the molding process, there's few imperfections in the body of the car which need sorting out.
Most noticeable the area around the headlights.
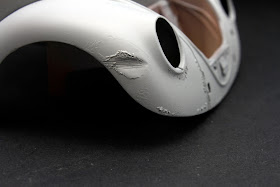
Horn grilles are also of the wrong shape.
1950 bug has round horn grilles, instead of oval ones.
I have removed the piping from the front fenders, to make preparation of the body easier.
I will replace the piping after the car is painted.
I filled the grilles in, and i drilled one single hole for the round horn grille.
It was only one opening for the horn grille in the real car, as the other grille is only used as decoration, and there was no opening in the body beneath it.

Rear fenders piping also removed. I used the CA glue as filler, and sanded it roughly.
Then i sprayed the car using matt grey primer to highlight the imperfections
Primer sanded, and Mr. Surfacer 500 used to fill here, and there again:

Body parts were dry fitted. It's not perfect, but i'll manage i think:
New line was added where piping will be fitted:

Same round the rear of the car. Lights positioning pins were removed, as i discovered today, that lights are much lover in 1950 cars:
Chaos Black primer is on. Generally it looks OK, just few places to sort out, before i start adding special effects like body damage, and rust.


